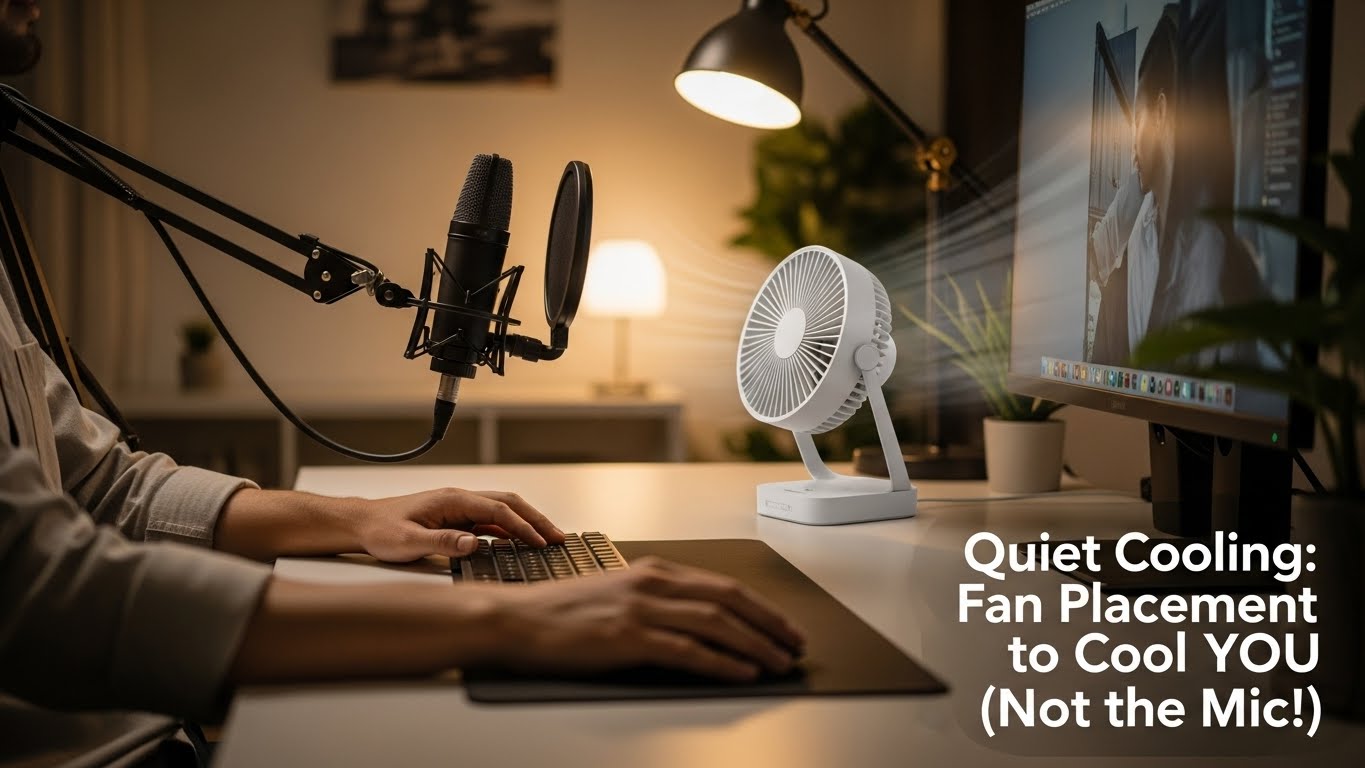
Quiet Cooling at a Desk: Fan Placement to Cool You (Not the Microphone)
How do I use a desk fan without adding “wind noise,” voice warble, and awkward call audio?
Use the Off-Axis + Low-Speed Rule: place the fan 30–60° to your side (cross-breeze), keep it below mouth level, and aim at upper chest/shoulder—not your face, not your mic.
If you want the same cooling with less noise, choose bigger blades + lower speed and let distance do the work.
The goal is simple: cool skin while keeping moving air out of the microphone’s pickup lane and off the desk surface (where it rebounds and roars).
- Fastest win: rotate the fan 15–30° more sideways and drop it 20–30 cm lower.
- Best baseline: fan aimed across you (cross-breeze), not at you (face-blast).
- Mic trick: keep the fan behind the mic’s “front” direction (use the mic body as a shield).
- Comfort trick: avoid direct airflow to eyes → less “gritty” feeling during long calls.
- People say you sound “underwater,” “fluttery,” or your voice level pumps up/down
- Your eyes feel dry/gritty after 30–60 minutes (you blink more, you rub eyes more)
- Your shoulders creep up or you lean away (your body is “defending” against the airflow)
- You keep turning the fan off whenever you speak (that’s your proof it’s in the mic lane)
This guide is informational and focuses on setup mechanics. If eye discomfort is persistent or worsening, reduce airflow to the face, consider room humidity, and consult a qualified professional.
Last Updated: 2026-01-16 |
Expert Review: WorkNest Ergonomic Lab |
Author: WorkNest Team
- Start low speed: lowest usable setting first. If you need more cooling, move the fan closer before you raise speed.
- Go off-axis: place the fan 30–60° to your side to create a cross-breeze.
- Keep it low: fan height at desk level or below so airflow stays under the mic lane.
- Protect the pickup lane: no airflow should travel from fan → mouth/mic in a straight line.
- Do the “Silence Test”: record 10 seconds speaking + 10 seconds silent. If the fan dominates silence, rotate farther sideways and drop it lower.
I used to think, “A fan is a fan.” Then summer hit, calls stacked up, and I learned the hard way:
the same breeze that feels amazing on your skin can make your microphone sound like a wind tunnel.
The worst part? You don’t always notice it—other people do.
After moving fans around like chess pieces (and recording way too many test clips), I realized quiet cooling isn’t about “silent fan marketing.”
It’s about air paths, mic pickup zones, and a couple of placement rules that stop turbulence from ever reaching your audio.
Table of Contents
- 1) Why fans get loud on calls (even when they feel “quiet”)
- 2) The pickup lane: where your mic “listens” (and where it’s blind)
- 3) The off-axis rule: placement that cools you, not the mic
- 4) The Quietness Triangle: size × speed × distance (what actually works)
- 5) Mic-specific setups: laptop vs USB desk mic vs headset
- 6) Desk vibration: the hidden rumble that makes you sound “boomy”
- 7) Troubleshooting protocol: “I did this and it’s still noisy”
- 8) Comparison table: hurricane setup vs pro setup
- FAQ
- Internal Links
- Sources & References
- Professional Disclaimer
1) Why fans get loud on calls (even when they feel “quiet”)
Your brain adapts to steady noise. A microphone doesn’t. A mic captures turbulence (air slamming into surfaces) and low-frequency rumble (vibration traveling through the desk).
That’s why a fan can feel “fine” to you but sound like a jet engine to everyone else.
- Turbulence on the mic grill: airflow physically shakes the mic’s sensor → “whoosh/roar.”
- Rebound off the desk: air hits the desktop, bounces upward into the mouth/mic area.
- Chassis noise: airflow hitting a laptop body/keyboard creates extra whoosh + vibration.
- Software artifacts: noise suppression can “fight” the fan and accidentally chew parts of your voice (warble/pumping).
Don’t judge fan noise while talking. Judge it during silence.
Record 10 seconds with you not speaking. If the fan becomes the loudest thing in the clip, your calls will sound worse than you think.
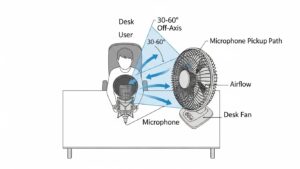
2) The pickup lane: where your mic “listens” (and where it’s blind)
Picture a straight hallway of sound from your mouth to the microphone. That’s the pickup lane.
If moving air crosses that lane—or hits the mic from the front—you get wind noise, voice pumping, and that “fluttery” sound.
Here’s the cheat code: cool the body without sending airflow through the hallway.
Your desk can actually help: keep the fan low so the desktop becomes a shield, not a trampoline.
- Green zone: airflow that passes across your torso and exits the workspace (side-to-side).
- Red zone: airflow moving fan → mouth/mic in a straight line.
- Risk zone: airflow that hits desk surface then rebounds upward.
- Eye zone: airflow aimed at eyes tends to feel drying; aim below chin.
3) The off-axis rule: placement that cools you, not the mic
In real home offices, the best “default” is side-front placement: fan at 30–60° to your left or right, aimed across you.
The air touches shoulder/upper chest, cools skin, and exits without ever slamming into the microphone.
Fan behind the monitor pointing at your face. It feels “clean,” but it pushes airflow into the mouth/mic area and rebounds off the desk/keyboard.
If you want cool air without audio chaos, go side + low.
drop the fan 20–30 cm, then rotate it 20° more sideways.
Re-run the Silence Test. Most setups fix right here.
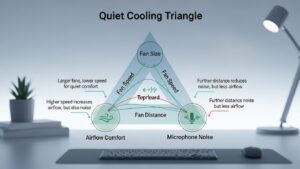
4) The Quietness Triangle: size × speed × distance (what actually works)
Here’s the physics reality: small fan + high speed is usually noisier than big fan + low speed.
You’re not just hearing a motor—you’re hearing fast, choppy air.
- Size: bigger blades move more air per rotation → less “whine” for the same cooling.
- Speed: high speed increases turbulence and that sharp blade-pass sound.
- Distance: a little more distance often smooths airflow before it reaches your mic lane.
If you need more cooling, try +6–12 inches closer before you try +1 speed notch.
Speed changes tend to explode turbulence; distance changes usually don’t.
5) Mic-specific setups: laptop vs USB desk mic vs headset
The rule stays the same—keep airflow out of the pickup lane—but the “lane” changes depending on your mic.
Use the setup that matches what you actually have today.
A) Laptop microphone (the hardest one)
- Why it’s sensitive: laptop mics are often more “open” to the whole room.
- Do this: keep fan lower and more sideways so airflow doesn’t hit the keyboard/laptop body.
- Avoid: fan aimed at the laptop chassis (it creates extra whoosh and vibration).
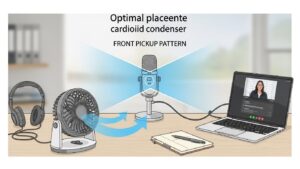
B) USB desk mic (cardioid pattern = you can use blind spots)
- Do this: keep the fan behind the mic’s front direction when possible.
- Quick check: speak closer to the mic and lower input gain—your voice gets louder, the fan gets quieter.
- Avoid: airflow hitting the mic grill (wind noise beats any software fix).
C) Headset mic (best isolation, but wind still wins)
- Do this: aim the fan at upper chest and keep it below chin level.
- Shield: a foam windscreen helps if air occasionally reaches the mic tip.
- Avoid: face blast (dry eyes + wind to mic tip = instant “flutter”).
6) Desk vibration: the hidden rumble that makes you sound “boomy”
Even if you solve wind noise, you can still sound weird if your fan is vibrating the desk.
Microphones love low-frequency rumble because it travels through surfaces and shows up as a “boomy” layer under your voice.
- Decouple the fan: put a folded microfiber towel, thin rubber mat, or mousepad under it.
- Separate the mic: don’t share the same desk surface if you can help it (even 10 cm can reduce transfer).
- Stabilize the base: wobble = noise. A fan on an uneven surface becomes a rumble generator.
7) Troubleshooting protocol: “I did this and it’s still noisy”
If you’re stuck, don’t random-walk. Use this sequence. Each step changes one variable so you can tell what worked.
- Silence Test first: 10 seconds speaking + 10 seconds silent. Identify whether the issue is wind or rumble.
- Drop the fan lower: 20–30 cm. This removes it from the mouth/mic lane fast.
- Rotate more off-axis: add 15–30°. Your goal: air path never intersects the mic lane.
- Back it up slightly: add distance, keep speed low. Let the airflow smooth out before it reaches you.
- Decouple vibration: add a mat/towel under the fan and re-test.
- Reduce mic gain: speak slightly closer, lower input gain. This shrinks the “room pickup.”
- Change the aim target: upper chest/shoulder beats face. Cooling your core works without drying eyes.
8) Comparison table: hurricane setup vs pro setup
| Signal | Noisy / uncomfortable setup | Quiet / stable setup |
|---|---|---|
| Call audio | wind roar during silence, voice pumping/warble | steady voice, fan fades into background |
| Fan placement | directly in front, aimed at face/mic lane | 30–60° side-front, aimed across torso |
| Fan height | mouth level or above (straight into mic) | desk level or below (desk helps shield) |
| Eye comfort | dry/gritty eyes, constant blinking | cool skin without direct eye blast |
| Noise type | high-speed whine + choppy turbulence | low-speed hum, minimal turbulence |
| Desk vibration | rumble transfers into mic | fan decoupled with mat/towel |
FAQ
Q1) Should I point the fan directly at my face to cool faster?
A) For calls, it usually backfires. Face-directed airflow often crosses the mic lane and can feel drying to eyes. A side cross-breeze is the safer default.
Q2) Is a smaller fan always quieter than a bigger fan?
A) Not always. Small fans often require higher speed to feel effective, which can create more turbulence noise. Bigger fan + lower speed is often quieter for the same comfort.
Q3) What’s the single quickest fix when someone complains about my audio?
A) Drop the fan 20–30 cm and rotate it 15–30° more sideways. Re-run a 10-second silence test.
Q4) Can noise-canceling software solve this instead?
A) It can help, but it may also compress/warp your voice if the fan dominates silence. You’ll get better results by fixing airflow direction first.
Q5) Where should the fan go if I use a laptop mic?
A) Keep it lower and more to the side so airflow doesn’t hit the keyboard/laptop body. Laptop mics can pick up turbulence and vibration from the chassis.
Q6) Why do I sound “warbly” even if the fan isn’t that loud?
A) Auto noise suppression and auto gain can react to steady fan noise and cause pumping/warble. Reducing airflow into the mic lane (and lowering mic gain) usually fixes it more than changing apps.
Internal Links
Desk Fan Home Office: Quiet Cooling Setup Rules
Best Desk Fans and Quiet Cooling Solutions for Home Office
Best Microphones for Home Office Calls and Meetings (2025)
Sources & References
- OSHA — Computer Workstations eTool: Workstation Environment (comfort/ventilation basics)
- NIOSH (CDC) — Heat Stress (heat exposure basics and prevention principles)
- HSE — Working with Display Screen Equipment (DSE) (PDF)
Professional Disclaimer
If you experience persistent or worsening symptoms (eye discomfort, headaches, dizziness), adjust airflow direction and room conditions and consult a qualified professional.
Update Log:
– 2026-01-16: Upgraded to a “pickup lane” model + step-by-step troubleshooting protocol, added desk vibration fixes, expanded mic-specific setups, and tightened the off-axis + low-speed standard for clearer calls.
HANDOFF (복붙용)
Title: Quiet Cooling at a Desk: Fan Placement to Cool You (Not the Microphone)
Meta Description: Fix fan noise on Zoom fast: place your desk fan 30–60° to the side, keep it below mouth level, use low speed, and keep airflow out of the mic pickup lane. Includes tests, mic-specific setups, and troubleshooting.
Permalink: https://workneststudio1.com/quiet-desk-fan-placement-microphone-noise/
Category: Small Room / Environment / Clean Setup
Tags: desk-fan, zoom-audio, home-office-cooling, microphone-tips, summer-setup

I’m not a medical professional, ergonomist, or workplace specialist.WorkNest exists to help everyday people build more comfortable, practical home office environments through clear explanations, visual guides, and common-sense adjustments.
Articles on this site are written from a non-expert perspective, focusing on real-world use, everyday discomforts, and widely accepted setup principles rather than clinical or professional advice.