Cable Management for Small Desks: Clean Home Office Setup Blueprint
Last Updated: 2025-12-12
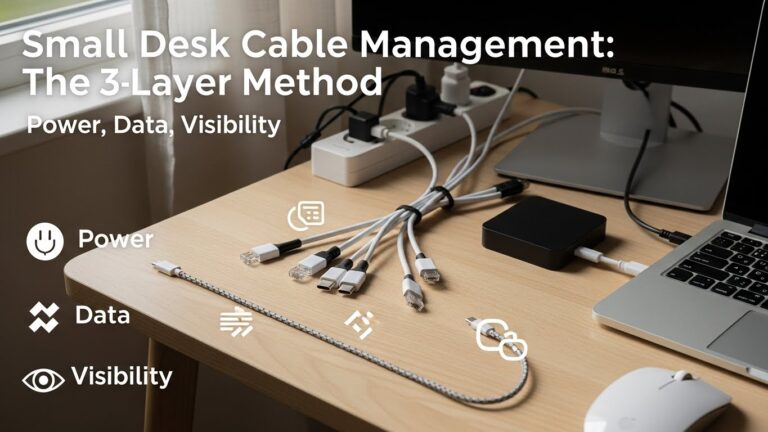
Cable management for small desks is one of the easiest ways to make a home office look cleaner, feel bigger, and function better. When cables are tangled under a tiny desk, they pull on devices, collect dust, and even limit how you move your chair or feet. This guide shows you a complete, practical blueprint for small desk cable management—from planning your power outlets to routing every cable so your setup looks clean from any angle.
Table of Contents
- Why Cable Management for Small Desks Matters
- Small Desk Cable Management Planning
- Power Strip Placement & Surge Protection
- Under-Desk Cable Trays and Channels
- Vertical Cable Routing Down the Desk Leg
- On-Desk Cable Management for a Clean Look
- Handling Laptop, Dock, and Mobile Device Cables
- Troubleshooting Common Small Desk Cable Problems
- Quick Cable Management Checklist
- FAQ
- Internal Links
- Disclaimer
- Sources & Transparency
- Author
Why Cable Management for Small Desks Matters
On a small desk, every centimeter counts. Poor cable management eats into your usable surface, makes cleaning harder, and can even create tripping or snagging hazards under the desk. Good cable management for small desks improves three things at once: safety, workspace clarity, and how “professional” your home office feels. A clean setup also makes it easier to focus because you are not staring at a mess of wires all day.
Small Desk Cable Management Planning
Before attaching any cable clips or trays, take a few minutes to plan. Small desk cable management works best when you know exactly which devices you use every day and where their cables need to go.
- List all devices: monitor, laptop, dock, speakers, lamp, charger, etc.
- Identify which ones are permanent and which are temporary (like a phone charger).
- Decide where power will enter the desk (wall outlet or floor outlet).
- Choose one “cable hub” under the desk where everything will gather.
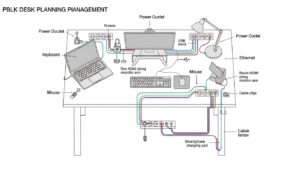
Power Strip Placement & Surge Protection
The heart of cable management for small desks is the power strip. Instead of leaving it on the floor, mount it under the desk or on the back edge. This keeps power bricks off the ground and closer to your devices.
- Use a surge-protected power strip to protect electronics.
- Mount the strip under the desk near the back edge.
- Leave a little slack so you can unplug devices without pulling hard.
- Keep only one thick power cable going down to the wall outlet.
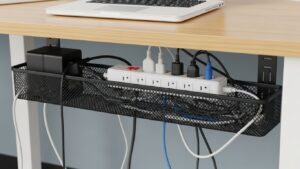
Under-Desk Cable Trays and Channels
Under-desk trays and cable channels are key tools for small desk cable management. They hold power bricks, chargers, and excess cable length so nothing hangs down visibly.
- Install a metal or mesh tray under the back of the desk.
- Place power bricks and long cables inside the tray.
- Use adhesive cable clips to route cables neatly into the tray.
- Avoid overstuffing; leave space so cables can be moved later.
Vertical Cable Routing Down the Desk Leg
Once cables are organized under the surface, route them vertically down a single desk leg. This keeps everything tight against the frame instead of hanging loosely in the middle.
- Choose the leg closest to the wall outlet.
- Use Velcro straps or a cable sleeve to bundle cables together.
- Attach the bundle along the leg using adhesive clips.
- Leave a gentle loop near the floor so cables are not pulled tight.
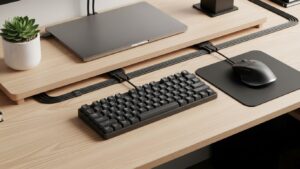
On-Desk Cable Management for a Clean Look
Small desk cable management is not only about hiding cables below; it is also about keeping the top surface tidy. A few simple tools help here:
- Use a cable grommet or pass-through hole near the back of the desk.
- Attach a few low-profile cable clips behind the monitor.
- Route keyboard and mouse cables straight back, then down through a grommet.
- Use a slim desk mat to hide small cable runs while protecting the surface.
Handling Laptop, Dock, and Mobile Device Cables
Laptops, docks, and phones introduce cables that move frequently. To keep a small desk from becoming messy again, design a simple docking routine.
- Use a vertical laptop stand so the footprint stays small.
- Connect monitors and peripherals to a single dock where possible.
- Use a cable holder near the front edge to park phone or tablet chargers.
- Label similar cables so you can quickly identify them.
Troubleshooting Common Small Desk Cable Problems
• Cables keep slipping off the desk
Add cable clips or a weighted cable holder near the front edge.
• Feet catch on cables under the desk
Move cables into a tray and route them along a desk leg instead of across the floor.
• Power bricks make the area look messy
Place bricks in the under-desk tray or behind the monitor stand.
• Need to move the desk for cleaning
Bundle cables into one or two main runs so they move together.
Quick Cable Management Checklist
- One power strip mounted under the desk
- Under-desk tray holding bricks and long cables
- Cables routed down a single desk leg
- Keyboard and mouse cables guided straight back
- Phone and laptop chargers parked in dedicated holders
FAQ
1. Is cable management for small desks worth the effort?
Yes. It improves safety, cleaning, and focus, especially in tight spaces.
2. Do I need special tools or only basic clips?
Basic clips, Velcro straps, and a single under-desk tray are enough for most setups.
3. How long does a full small desk cable management setup take?
Most people can finish a complete re-route in one to two hours.
4. Can I still move my desk after managing cables?
Yes, as long as cables are bundled and routed along one leg with enough slack.
5. How often should I review my cable management?
Check after adding new devices and do a quick review every few months.
Internal Links
- Desk Height by Body Height Setup Guide
- Monitor Distance and Eye-Level Guide
- How to Arrange a Small Home Office in a Tight Apartment
Disclaimer
This guide provides general organization and home office setup suggestions. It is not electrical or professional installation advice.
Sources & Transparency
Author
Written by: Home Office Setup Project — Evidence-Informed Ergonomic & Organization Guidance

I’m not a medical professional, ergonomist, or workplace specialist.WorkNest exists to help everyday people build more comfortable, practical home office environments through clear explanations, visual guides, and common-sense adjustments.
Articles on this site are written from a non-expert perspective, focusing on real-world use, everyday discomforts, and widely accepted setup principles rather than clinical or professional advice.