Home Office Lighting Layers: Task Light vs Ambient Light vs Monitor Bias Light
What’s the best lighting setup for a home office—without eye strain, glare, or “washed-out” screens?
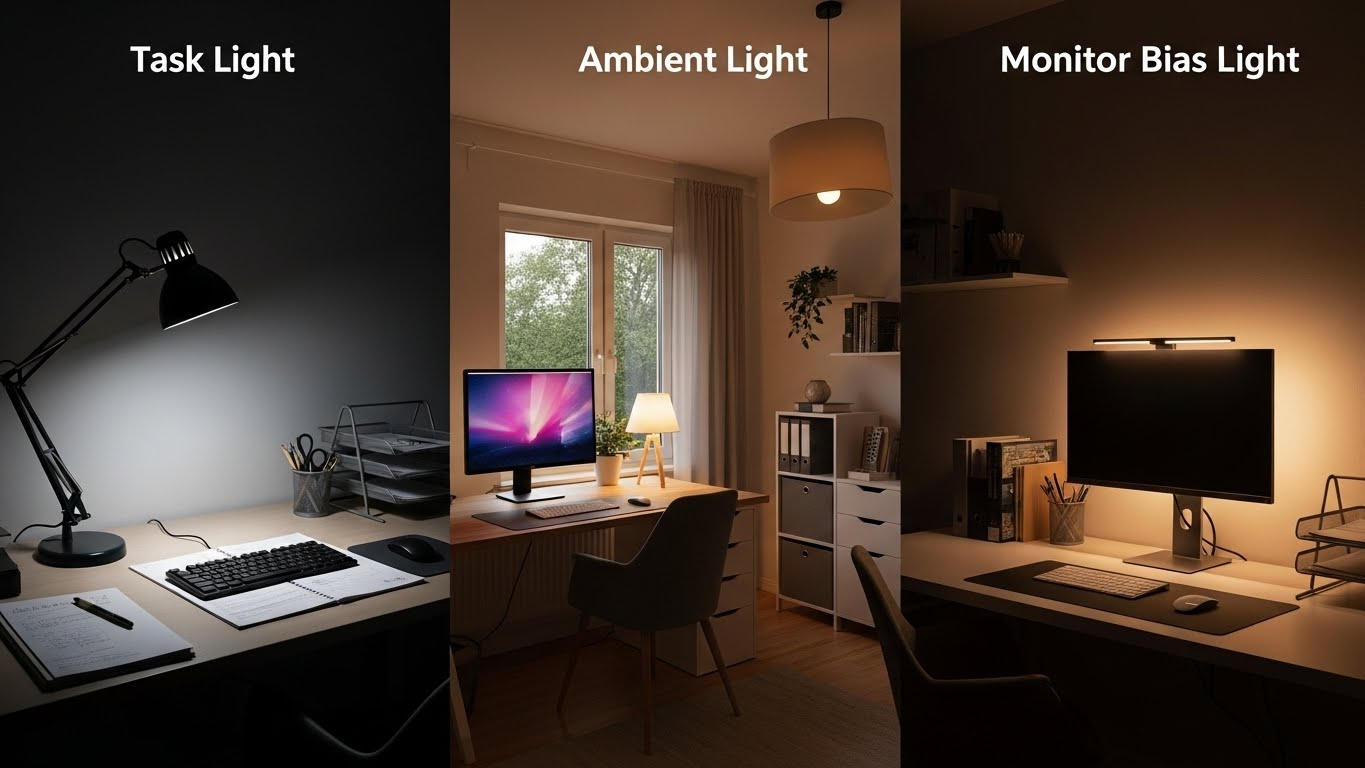
Build three layers—ambient (room baseline), task (desk clarity), and monitor bias light (behind-screen glow).
If your eyes feel “tired” even with low brightness, the real problem is usually not the monitor. It’s the contrast gap between a bright screen and a dark room.
- Ambient: make the space around your monitor not cave-dark
- Task: light your hands/notes without lighting your face or reflecting on the screen
- Bias: soften the wall behind the monitor so the screen stops feeling “sharp”
- Glare rule: if the bulb shows up on the screen during normal head movement, placement is wrong
- Fast check: if your eyes feel dry by mid-afternoon, your room is probably too dark around the monitor
- Headaches that reliably show up after screen work
- Burning, gritty eyes, or blur when you look across the room
- You keep lowering brightness but the screen still feels harsh
- You lean/tilt your head to escape a reflection you can’t explain
This guide is informational. If symptoms are persistent, worsening, or paired with vision changes, consider an eye-care professional.
Last Updated: 2026-01-15 |
Expert Review: WorkNest Ergonomic Lab |
Author: WorkNest Team
- Turn on ambient first: you should be able to see the wall behind your monitor clearly (not dramatic, not dim).
- Add task light from the side-front: aim at the keyboard/notes, not your eyes, not your screen.
- Add bias behind the monitor: soft wall glow, not “cool gamer lights.”
- Black-screen reflection test: open a black screen—if you see a bulb reflection, move the lamp (not your chair).
- 10-minute reality test: if you stop squinting and stop micro-leaning, you’re close.
Lighting sounds like a “nice to have” problem—until your workday turns into a slow battle.
There’s a specific moment around mid-afternoon where the screen starts feeling loud, like your eyes are doing extra labor just to read.
That’s not a personality flaw. That’s contrast stress.
The goal isn’t perfect studio lighting. It’s a setup that stays comfortable when daylight shifts, when you change posture, and when you bounce between typing, reading, and calls.
In real homes, stability beats perfection.
Table of Contents
- 1) Why “more brightness” backfires
- 2) Task light placement: the 3 angles that don’t glare
- 3) Ambient light: how to remove the “cave effect”
- 4) Bias light: what it does (and what it doesn’t)
- 5) Real room fixes: window glare, small rooms, night work
- 6) Comparison table: stable vs draining lighting
- Common Mistakes
- FAQ
- Internal Links
- Sources & References
- Professional Disclaimer
1) Why “more brightness” backfires
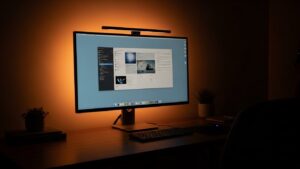
Here’s the sneaky part: a bright monitor is not always the villain.
The real problem is often the gap—a bright screen surrounded by a dark room.
Your eyes keep adjusting between two worlds: “screen bright” and “room dim.”
That constant adjustment is what people describe as harsh, dry, or mentally draining.
The fix is not to nuke your brightness.
It’s to raise the room baseline so the monitor isn’t the only thing carrying the scene.
When the background is gently lit, the screen stops feeling like a spotlight.
width=”1200″ height=”675″ loading=”lazy” style=”border-radius:10px; border:1px solid #eee;”>
2) Task light placement: the 3 angles that don’t glare
Task light should hit your work surface—not your eyes, not the monitor.
If a lamp makes your screen look worse, it’s usually creating a reflection you only notice when you shift posture.
- Angle A (best for most desks): side-front at about 45°, aimed at your keyboard/notes.
- Angle B (paper-heavy days): side-front but lower angle, so the light stays on paper and doesn’t splash onto the screen.
- Angle C (small desk): clamp lamp from the side, aimed down, with the bulb hidden by a shade.
Keep your lamp on. Move your head naturally left/right like you do when you think or read.
If a bright streak crawls across the monitor, your lamp is in the wrong place. Rotate the lamp head or move it side-front until the screen stays clean.
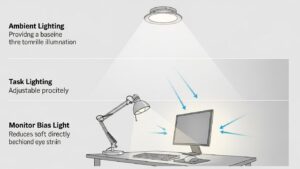
3) Ambient light: how to remove the “cave effect”
Ambient is the layer most home offices miss because it doesn’t feel “productive.”
But it’s the layer that makes your eyes stop fighting.
If you’re working in a dim room, your screen becomes a single intense light source—like a phone in a dark theater.
- Goal: make the wall behind and around your monitor visible and calm.
- Better than harsh overhead: bounced light (off ceiling/wall) usually feels smoother.
- Evenness matters: one bright hotspot + dark corners can feel weirdly exhausting.
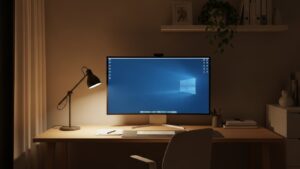
4) Bias light: what it does (and what it doesn’t)
Bias light is a soft glow behind the monitor.
It’s not meant to light your room, and it’s not meant to look cool.
It’s there to keep the wall behind the screen from being pitch dark—so your eyes don’t bounce between extremes.
- Placement: behind monitor, aimed at the wall.
- Brightness feel-check: “calmer” is good; “noticeable all day” is usually too bright.
- Night sessions: bias + mild ambient is the best combo for reducing the spotlight effect.
5) Real room fixes: window glare, small rooms, night work
Real homes have shifting daylight, messy corners, and late-night work.
These quick rules hold up when your setup is not perfect.
- Window glare days: raise ambient a bit + close blinds slightly + move task light side-front.
- Small room feels harsh: avoid one intense overhead; use softer ambient + bias behind monitor.
- Night work: keep ambient gentle, task light only where needed, bias behind the monitor to calm contrast.
- Video calls: don’t use your task lamp as face light; use a softer off-axis lamp near camera height if needed.

6) Comparison table: stable vs draining lighting
| Signal | Draining setup | Stable setup |
|---|---|---|
| Eyes | squinting, dry/gritty feeling | relaxed gaze, fewer “brightness fights” |
| Screen clarity | hotspots, reflections when you move | clean contrast across normal head movement |
| Posture drift | micro-leaning to escape glare | you forget lighting exists and just work |
| Evening work | screen feels like a spotlight | bias + mild ambient keeps the scene calm |
Common Mistakes (the ones that quietly ruin everything)
- Using one lamp to do everything: it usually creates glare and leaves the room too dark.
- Task lamp facing the monitor: looks fine until you move—then reflections appear.
- Bias light too bright: if it feels like “decor,” it’s often too intense for comfort.
- Overhead-only lighting: bright on top, dark around the screen = contrast stress.
- Fixing pain with brightness alone: brightness is last; room baseline is first.
FAQ
Q1) If I can only pick one: task light or ambient light?
A) If the room is dim, start with ambient. It reduces contrast stress. Add task light later if you do paper work or detailed hand work.
Q2) Is bias light only for gamers?
A) No. It’s a comfort tool. It makes the wall behind the screen less dark so the display feels less aggressive—especially at night.
Q3) Why does my lamp make my screen look worse?
A) It’s usually a reflection. Move the lamp to a side-front position and do the head-move test until reflections disappear.
Q4) Is working in a dark room with only the monitor okay?
A) Some people tolerate it briefly, but long sessions often feel harsh because contrast is extreme. Even a small amount of ambient or bias light can make it sustainable.
Q5) What’s the first thing to check if my eyes feel tired but lighting “looks fine”?
A) Look at the wall behind the monitor. If it’s much darker than the screen, add gentle ambient or bias light before touching monitor brightness.
Internal Links
Home Office Lighting Setup: Best Lighting Practices to Reduce Eye Strain
LED Desk Lamp Guide: Color Temperature and Productivity
Screen Glare Small Rooms: 7 Ways to Prevent Reflection and Eye Strain
Sources & References
- OSHA — Computer Workstations eTool: Workstation Environment (Lighting & Glare)
- HSE — Working Safely with Display Screen Equipment (DSE)
- CDC/NIOSH — Ergonomics
Professional Disclaimer
If you have persistent headaches, visual discomfort, or worsening symptoms, consult a qualified professional.
Update Log:
– 2026-01-15: Rebuilt the guide for real-world stability (ambient/task/bias), added reflection tests, scenario fixes, mistakes section, and an easier quick setup flow.
I’m not a medical professional, ergonomist, or workplace specialist.WorkNest exists to help everyday people build more comfortable, practical home office environments through clear explanations, visual guides, and common-sense adjustments.
Articles on this site are written from a non-expert perspective, focusing on real-world use, everyday discomforts, and widely accepted setup principles rather than clinical or professional advice.