Desk Height for Long Typing Sessions: Elbow Angle, Wrist Neutral, and Common Mistakes
Answer Box — What desk height is best for long typing sessions?
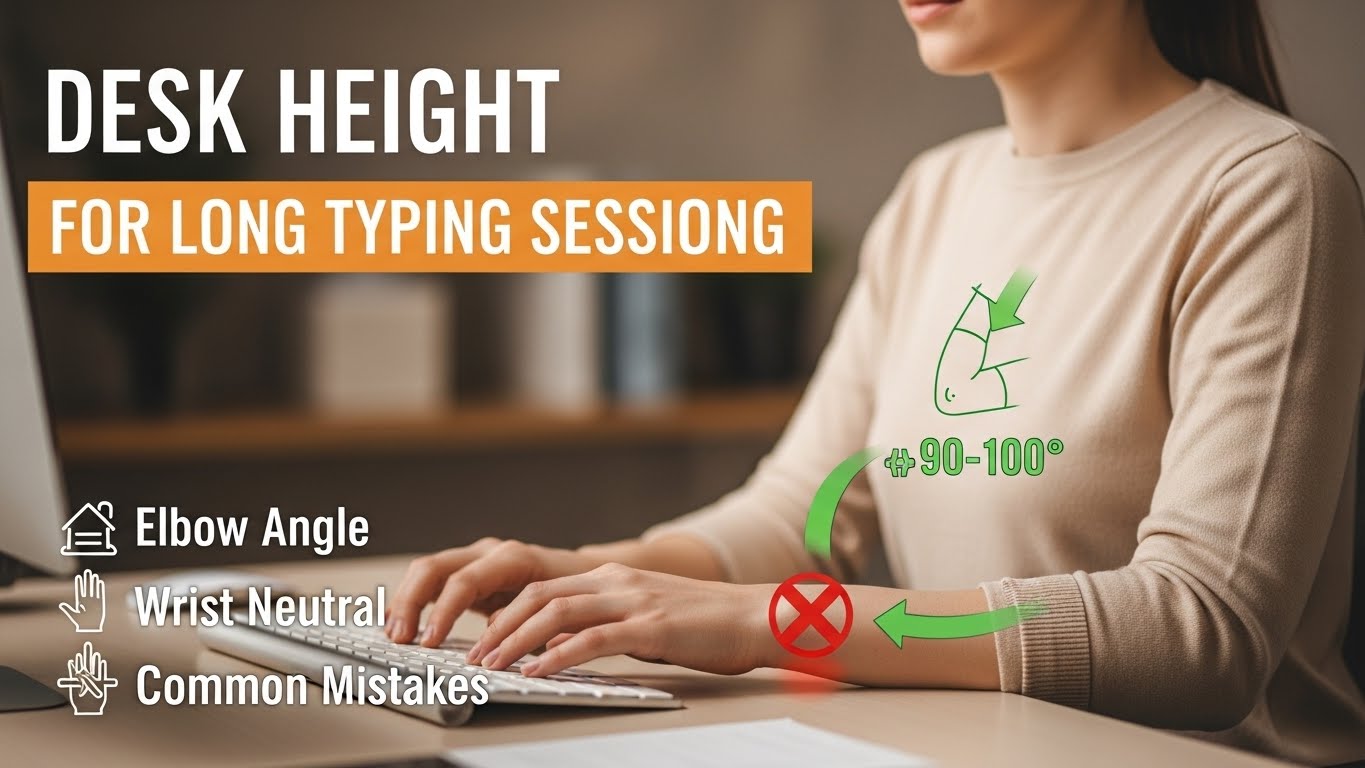
The best desk height for long typing sessions is the height that keeps your elbows slightly open (about 90–100°),
your wrists neutral (not bent up or sideways), and your shoulders “quiet” (not creeping toward your ears).
In real life, this usually means your keyboard surface sits at (or slightly below) your seated elbow height.
- Target: Elbows 90–100° + wrists straight + shoulders relaxed.
- Rule of thumb: Keyboard height ≈ seated elbow height (±1–2 cm).
- Fast self-check: The “Float Test” (explained below) should feel easy, not heavy.
- Shoulders rising while typing (you “shrug” without noticing).
- Wrist extension marks (red pressure at the heel of your palm).
- Numbness/tingling in thumb/index after long typing.
- Neck tension that builds faster the longer you type.
- Forearm burning from holding hands “uphill” over the keys.
Last Updated: 2026-01-03 |
Expert Review: WorkNest Ergonomic Lab |
Author: WorkNest Team
“My desk feels fine… until hour three.”
That’s the trap with typing ergonomics. Short sessions are forgiving because your body quietly compensates.
But once you hit 4+ hours, tiny height mistakes become loud: shoulders creep up, wrists bend,
and your neck starts doing the work your setup was supposed to do.
The good news: desk height isn’t a mystical number. It’s a biomechanical target.
Get the target right and everything downstream—keyboard feel, mouse control, shoulder calm—gets easier.
2) The 3-minute measurement (no special tools)
3) Fixed desk? Chair-first logic (the only order that works)
4) Wrist-neutral keyboard & mouse geometry
5) Common desk height mistakes & rapid corrections
6) The Float Test (the fastest shoulder truth-check)
7) “Good vs risky” signals table
FAQ
Internal Links
Sources & References
1) The ergonomic target: “biomechanical slack” (why long typing is different)
For quick tasks, your body can “fake” a setup through muscle effort. For long typing, that strategy fails.
The goal is slack: your arms feel supported by alignment, not held up by tension.
When slack is real, your shoulders stay low, your elbows stay close, and your wrists stay straight without you policing them.
Desk too low → you collapse forward (neck + upper back do overtime).
Desk just right → elbows open ~90–100°, wrists neutral, shoulders quiet.
2) The 3-minute measurement (no special tools)
- Sit back in your chair (don’t perch on the edge).
- Place feet flat. If your feet don’t reach, note it (you’ll fix this in Section 3).
- Let your arms hang, then bend elbows naturally until hands hover over an imaginary keyboard.
- Notice your elbow angle: aim for 90–100° (slightly open, not tight).
- That height—your seated elbow height—is your keyboard surface target.
If you remember only one thing: keyboard height follows elbow height.
Everything else is a workaround.

3) Fixed desk? Use the chair-first logic (the only order that stays sane)
Here’s the mistake: people lower the chair to “feel comfortable,” then their desk becomes too high,
then shoulders start shrugging, then wrists bend… and the day ends with neck tension.
The stable order is the opposite:
| Order | What to adjust | Why it works |
|---|---|---|
| Step 1 | Set chair height for elbows 90–100° at keyboard height | Locks the typing mechanics first |
| Step 2 | If feet float, add a footrest (not a compromise—foundation) | Prevents pelvic tilt and slumping compensation |
| Step 3 | If desk is still too high, lower keyboard with a tray or thinner surface | Protects wrists/shoulders without breaking leg support |
If your desk is fixed and tall, the “pro” move is usually raise chair + footrest.
If your desk is fixed and low, you’ll often need seat support + desk risers (or an adjustable desk later).

4) Wrist-neutral keyboard & mouse geometry (the hidden desk-height multiplier)
Even with perfect desk height, wrists can still suffer if your keyboard and mouse are positioned wrong.
Desk height sets the “platform,” but input geometry decides whether your wrists stay neutral or slowly bend into strain.
- Keyboard close: keep it near the desk edge so elbows stay under you (not reaching forward).
- Mouse same plane: mouse height should match keyboard height—no “drop-off” to a lower surface.
- Centering: keyboard centered to your body reduces sideways wrist bending and shoulder asymmetry.
- Skip hard palm-pressing: resting weight on the heel of the hand often pushes wrists into extension.
5) Common desk height mistakes & rapid corrections (symptom → cause → fix)
| Symptom | Biomechanical cause | 0.1% fix (fastest correction) |
|---|---|---|
| Wrist soreness | Wrist extension (typing “uphill”) | Lower keyboard surface OR raise chair + add footrest. |
| Neck / trap tension | Scapular elevation (desk too high) | Lower keyboard height until shoulders naturally “sink.” |
| Finger tingling | Compression + sustained tension | Neutral wrists + avoid hard palm pressure + micro-breaks. |
| Lower back fatigue | Feet unsupported → pelvic tilt → slumping | Footrest + sit-back posture (don’t perch forward). |
6) The Float Test (fastest shoulder truth-check)
The Float Test is brutally honest because it reveals whether your arms are supported by alignment or by shoulder tension.
If your shoulders immediately feel like they’re “holding” your arms, your setup is likely too high (or too far forward).
If hovering feels easy and your shoulders stay quiet, you’re close to your ideal height.

7) “Good vs risky” signals table (so you can self-diagnose in 10 seconds)
| Good (green) | Risky (red) |
|---|---|
| Shoulders stay low without effort | Shoulders creep upward / shrugging |
| Wrists look straight from the side | Wrists bend up (extension) or sideways |
| Elbows sit close to your torso | Elbows flare out / reaching forward |
| You can “float test” without strain | Float test feels heavy immediately |
| Feet feel stable (floor or footrest) | Feet dangling → you slide forward to compensate |
FAQ
Q1) Is there one “perfect” desk height for everyone?
No. The reliable target is your seated elbow height, not a universal number.
Q2) My desk is fixed and too high—what’s the best workaround?
Most of the time: raise chair + add a footrest. If wrists are still uphill, consider a keyboard tray or thinner keyboard surface.
Q3) Why do my wrists hurt even when my elbows look “okay”?
Keyboard slope and distance often cause hidden wrist extension. Move the keyboard closer and reduce “uphill” angle.
Q4) Does a wrist rest fix desk height problems?
It can reduce pressure, but it won’t fix a desk that forces wrist extension. Height and slope come first.
Q5) How long until I feel the difference?
Many people notice shoulder/neck changes within a few days—especially if shrugging was the main issue.
Q6) When should I take symptoms seriously?
If numbness, radiating pain, or weakness is persistent or worsening, get a professional evaluation.
Internal Links
Desk Height by Body Height: The Science of Proportional Setup
Keyboard and Mouse Positioning Guide: Wrist Pain Prevention
Monitor Distance and Eye-Level Setup Guide (OSHA-informed)
Sources & References
OSHA: Computer Workstations eTool
NIOSH (CDC): Ergonomics Topic
HSE (UK): Display Screen Equipment (DSE) guidance
This article is for educational purposes only and does not provide medical advice.
If symptoms persist, worsen, or include neurological signs (numbness/weakness), consult a qualified professional.
Update Log:
– 2026-01-03: Rebuilt into “Answer Box + Warning Box + TOC + diagnostics tables + Float Test” format and aligned guidance with major safety/ergonomics references.

I’m not a medical professional, ergonomist, or workplace specialist.WorkNest exists to help everyday people build more comfortable, practical home office environments through clear explanations, visual guides, and common-sense adjustments.
Articles on this site are written from a non-expert perspective, focusing on real-world use, everyday discomforts, and widely accepted setup principles rather than clinical or professional advice.